This guide will show you how to easily setup Uniswap V4 Hooks on a FairTrade contract and see them in action through Foundry unit testing.
Get Started
You will need to navigate to cookbook.dev and use the global search and type FairTrade. This presents all available contracts that are currently using Hooks. Select the FairTrade contract. You will be navigated to the source page for this contract. Lets start by focusing on the info tab on the top right of the page. This is where you will find a high-end overview of all details related to this contract.
Installation
Step 1: Install Rust - https://doc.rust-lang.org/ch01-01-installation.html
Step 2: Install Foundry https://book.getfoundry.sh/getting-started/installation#using-foundryup
Once you have Foundry installed you will need to download the source files to your machine. You will find those simply by clicking the Download Source button. Now that you have downloaded the source files, open them up in your favorite IDE. We will be using VScode. Next, go ahead and run the units tests to ensure that everything is working as it should out of the box.
Step 3: Build - forge build
Step 4: Test - forge test
You should see all green passing tests.

There you go! You are officially ready to see the hooks in action, but before we dive into the code lets review what makes Uniswap hooks unique.
Understanding the key to Uniswap v4 hooks
A basic hook is ran before or after a trigger is called and that is no different here. Also, the logic within the hook can be whatever you like. Again, no difference here. The main difference is not contained within the construction of hook logic, it has to do with the configuration of the hook contract address.
When we deploy a standard smart contract, we normally do not care what address is produced but with Uniswap V4 hooks that is the most important part. You see, we MUST ensure that our contract is pre-fixed with the proper leading byte. This is because Uniswap will be referencing all 8 bits that make up that byte. The reason has to do with gas optimization and is actually very clever. The team at Uniswap Labs have created 8 hooks that can be configured when used within the lifecycle of a liquidity pool. They have then mapped each hook to a bit within that leading byte. Awesome, right?!?
Take a look at this for a visual understanding
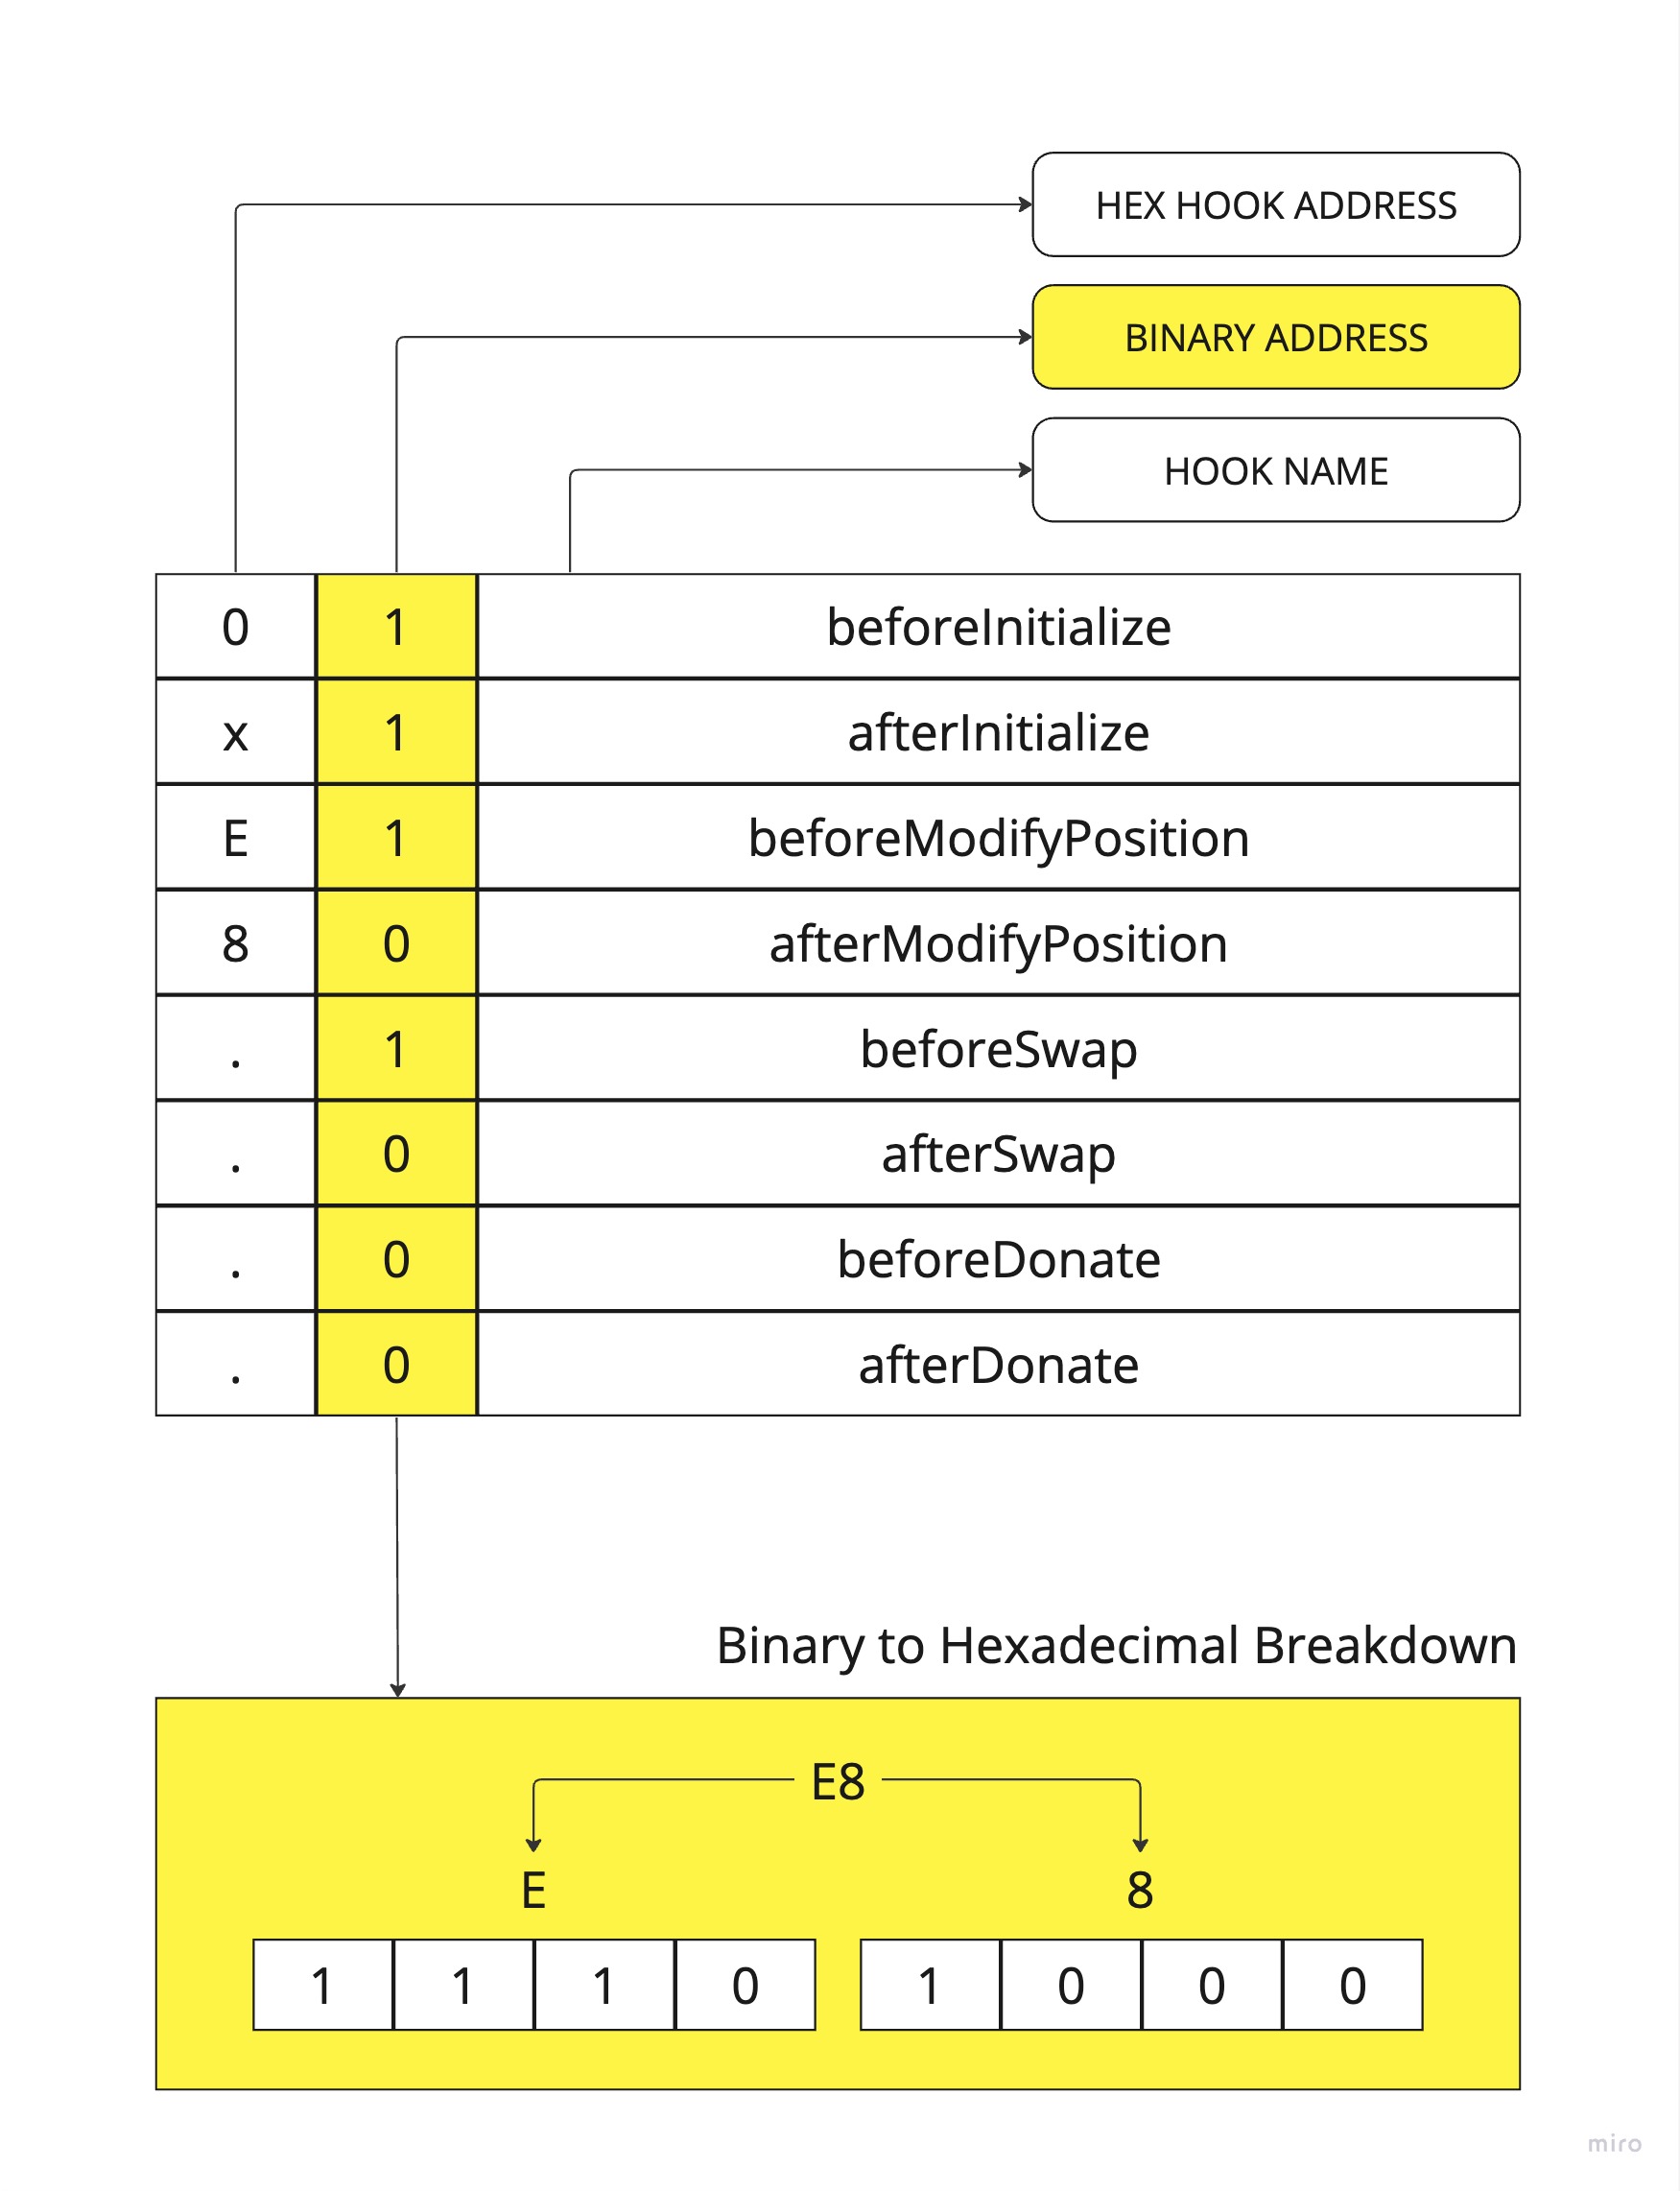
With respect to our FairTrade contract, we require the leading byte to be E8 as that is the hexadecimal breakdown representing our desired hook configuration.
Configuring hooks locally
So, with that in mind we can go ahead and review just how this FairTrade contract is handling the local hook configuration.
function getHooksCalls() public pure override returns (Hooks.Calls memory) {
        return
            Hooks.Calls({
                beforeInitialize: true,
                afterInitialize: true,
                beforeModifyPosition: true,
                afterModifyPosition: false,
                beforeSwap: true,
                afterSwap: false,
                beforeDonate: false,
                afterDonate: false
            });
    }
The above code snippet is taking from the FairTrade.sol contract and shows that we need to overload the getHooksCalls function. This is evident due to the override keyword within the function signature. All hooks that we want our FairTrade.sol contract to utilize must be set to true. Once we have done that, we need to override those hook functions with our custom logic.
Creating the custom contract address
Great, we have made it to the fun part! In order to emulate the contract address requirements we are going to need to do some crafty work using Foundry.
The core logic found at FairTrade.t.sol is in the HookMiner function. This takes in our flag configuration, along with the address of our contract under test, the creation byte code, encoded constructor arguments and a salt starting at 0.
(address hookAddress, bytes32 salt) = HookMiner.find(
            address(this),
            flags,
            0,
            type(FairTrade).creationCode,
            abi.encode(address(manager), "Test Token", "TEST", 18)
        );
It will run a loop incrementing the salt, generating a contract address. It then checks the prefix against our flag configuration. Remember, we are looking for a the leading byte to be E8.
function find(
        address deployer,
        uint160 flags,
        uint256 seed,
        bytes memory creationCode,
        bytes memory constructorArgs
    ) external pure returns (address, bytes32) {
        address hookAddress;
        bytes memory creationCodeWithArgs = abi.encodePacked(
            creationCode,
            constructorArgs
        );

        uint256 salt = seed;
        for (salt; salt < MAX_LOOP; ) {
            hookAddress = computeAddress(deployer, salt, creationCodeWithArgs);
            if (uint160(hookAddress) & FLAG_MASK == flags) {
                return (hookAddress, bytes32(salt));
            }

            unchecked {
                ++salt;
            }
        }
        revert("HookMiner: could not find salt");
    }
function computeAddress(
        address deployer,
        uint256 salt,
        bytes memory creationCode
    ) public pure returns (address) {
        return
            address(
                uint160(
                    uint256(
                        keccak256(
                            abi.encodePacked(
                                bytes1(0xFF),
                                deployer,
                                salt,
                                keccak256(creationCode)
                            )
                        )
                    )
                )
            );
    }
Once we have the proper prefix on our contract address we are ready to deploy our contract address using CREATE2.
Deploying the hook contract
The CREATE2 opcode allows us to deploy a contract with a deterministic contract address. All we need to do is pass the same input parameters to the method along with the salt that successfully generated our required contract prefix.
Technical Note
As you review the setup function on FairTrade.t.sol you will notice that I skipped over some steps. There is a process using Foundry that was implemented in order to properly deploy the contract. It uses cheat codes such as etch , accesses , store and load to produce a deterministic contract address. These steps, although important, are outside the scope of this article. The take-a-way here is to understand that in production, deploy would use CREATE2 but these tests had to create a work-around to simulate that.
In the constructor of our FairTradeImplementation.sol contract we will need to call the validateHookAddress which is a library method provided by v4-core found within the Hooks.sol contract. This method will take our generated contract address and the getHooksCalls() function that we overloaded earlier. It then runs validation against those inputs. If no errors are generated, then congratulations, you have successfully deployed a valid hook contract.
contract FairTradeImplementation is FairTrade {
    constructor(
        IPoolManager poolManager,
        FairTrade addressToEtch,
        string memory name,
        string memory symbol,
        uint8 decimals
    ) FairTrade(poolManager, name, symbol, decimals) {
        Hooks.validateHookAddress(addressToEtch, getHooksCalls());
    }

    function validateHookAddress(BaseHook _this) internal pure override {}
}
Hooks in action
Open up your terminal and run the following script. It is provided in the package.json
yarn run FairTrade
This is going to provide you with heavily verbose trace logs. You can modify the test script to reduce the level.
To see the whole contract flow and the triggering of our hooks it is advised that you add console logs to the unit tests otherwise you are left to trace through verbose logs like these.
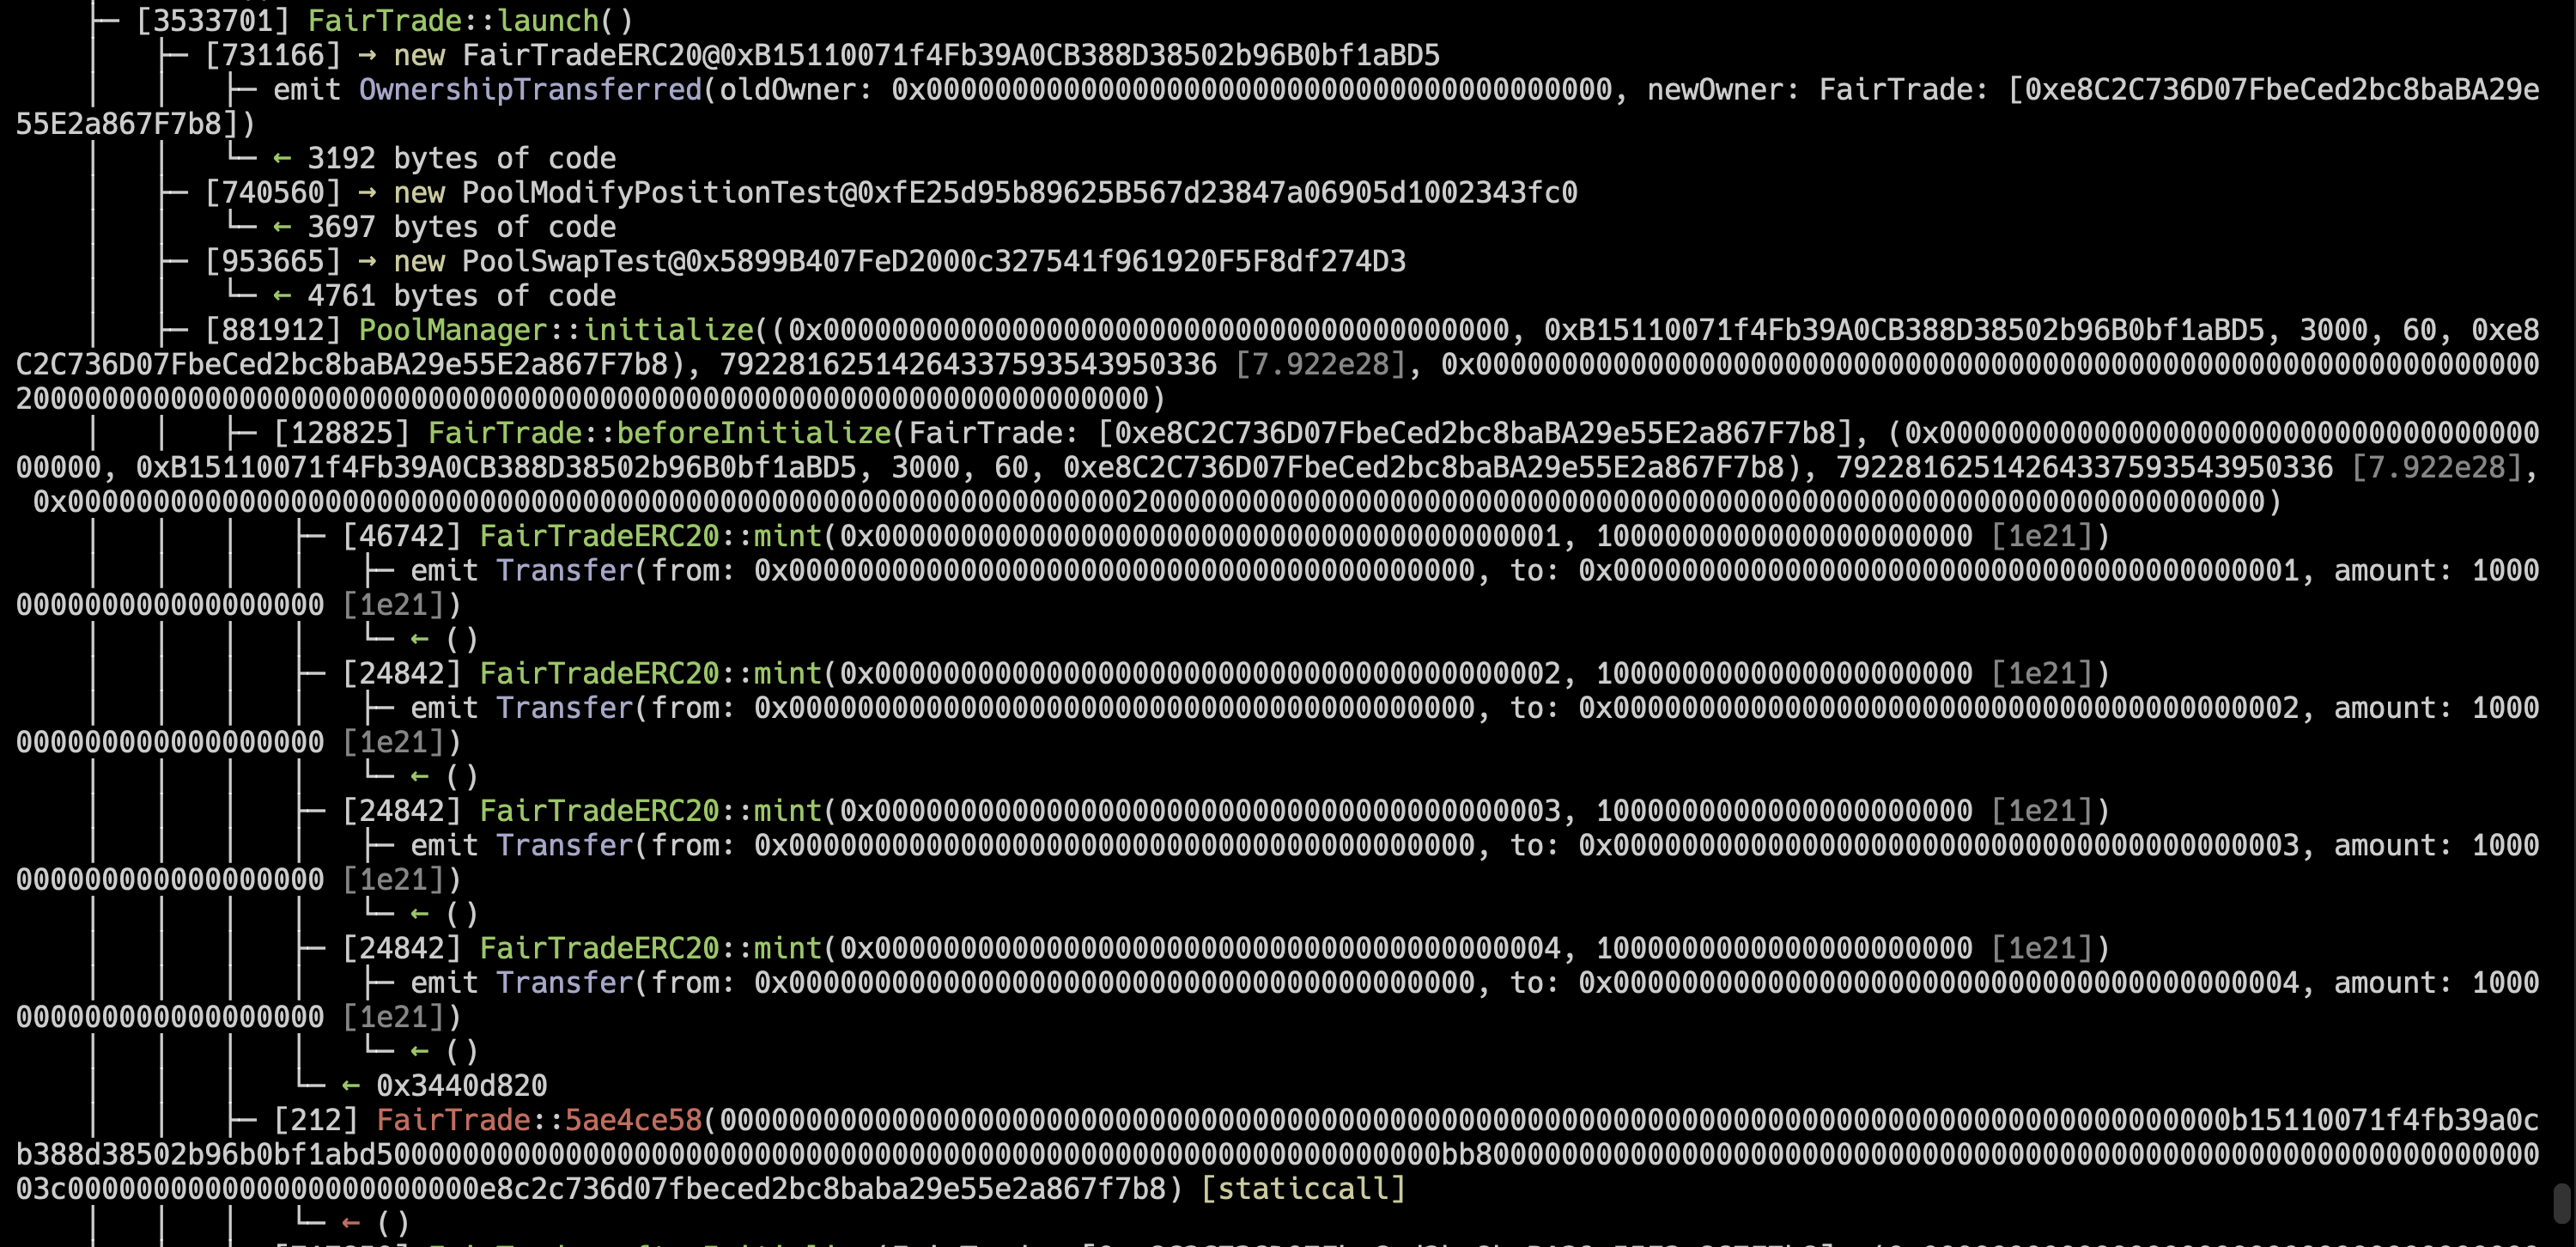
Lets review how this contract works by reviewing my additional log statements. You can see this exact flow as you follow the trace logs.
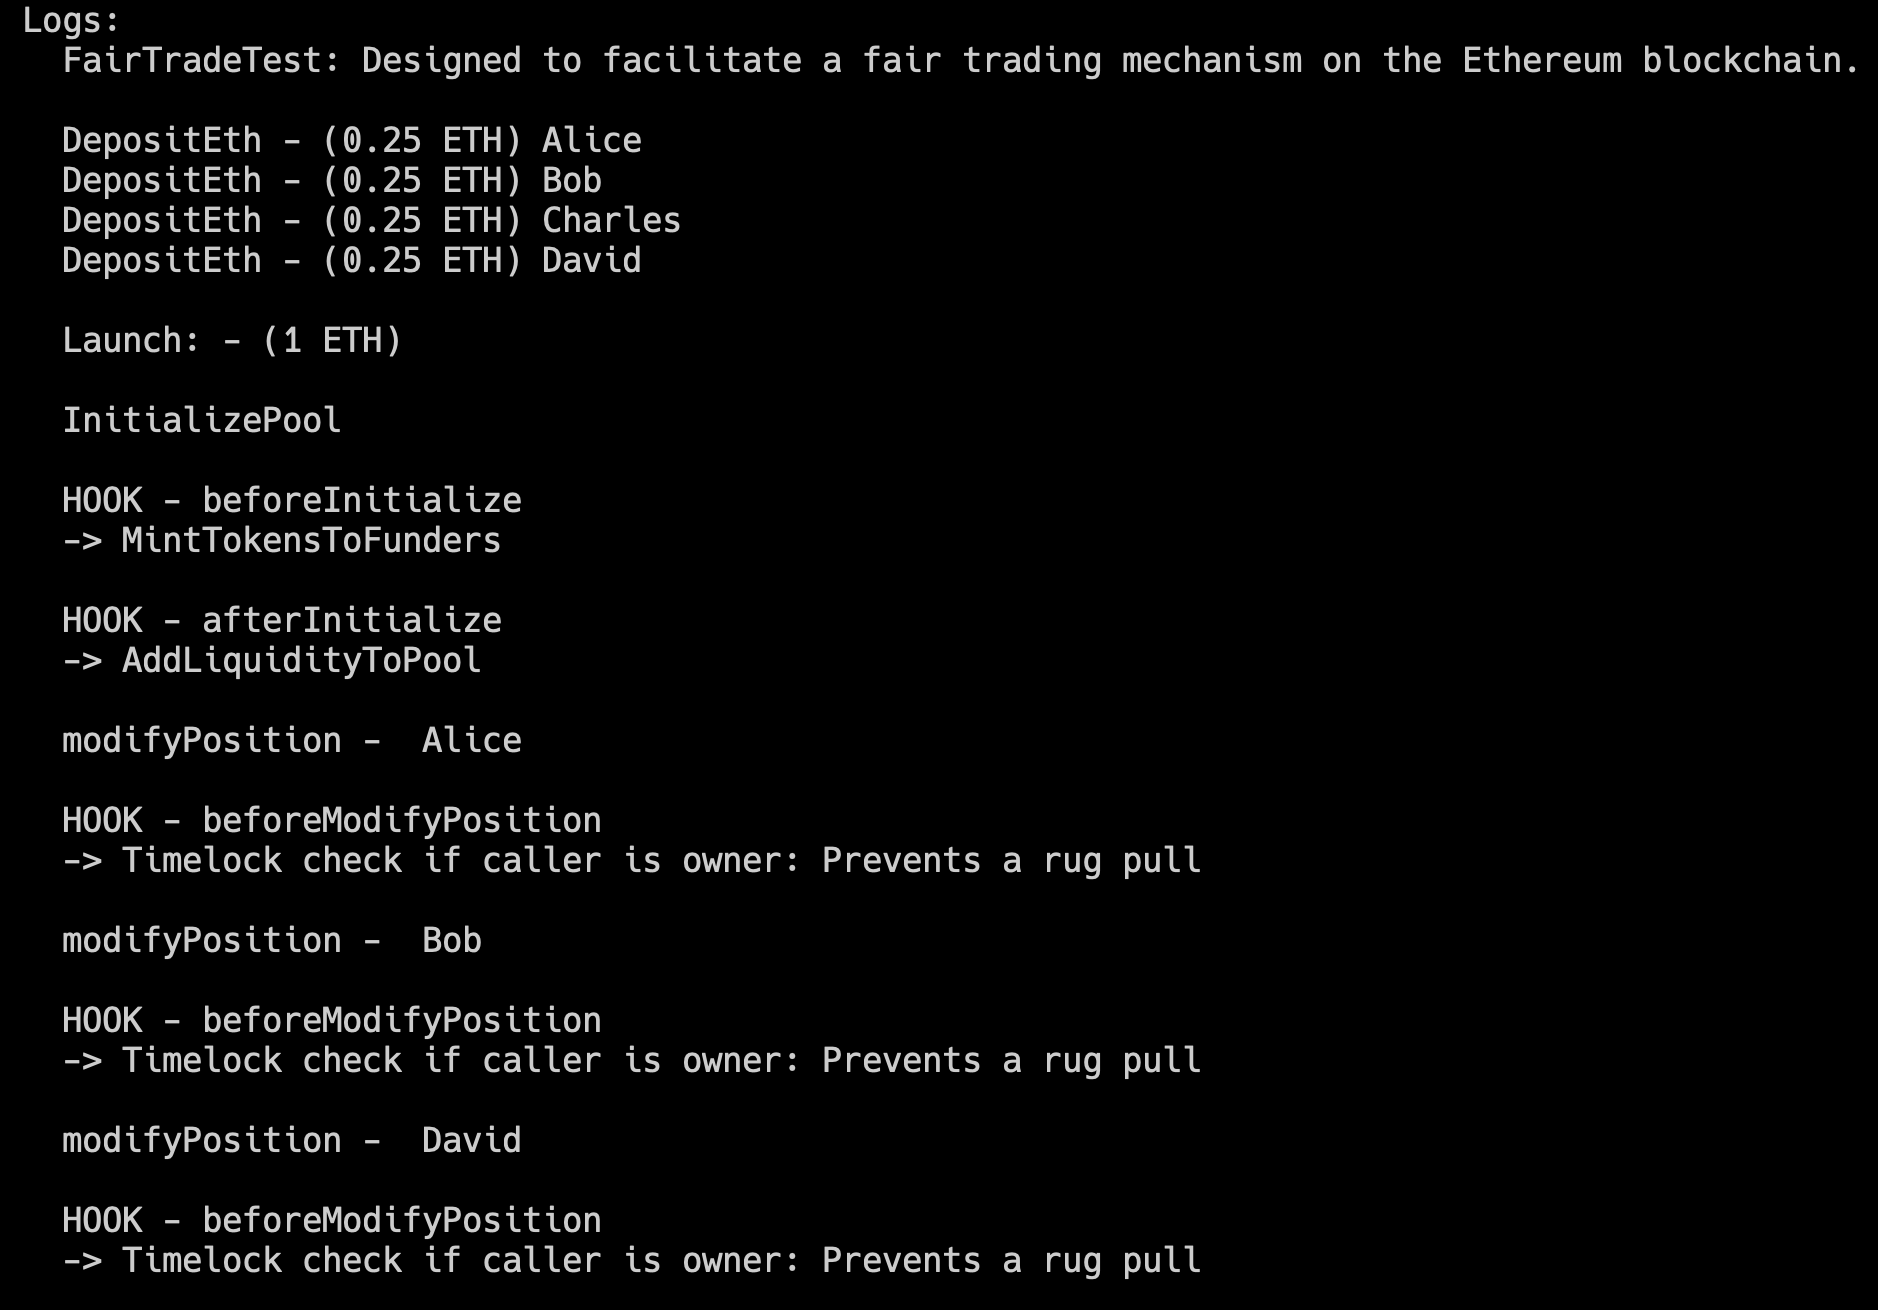
We have 4 users, Alice, Bob, Charles and Dave. They each deposit a required 0.25 ETH each. This creates a funded total of 1 ETH.
InitalizePool
The initializePool method is a point in the pool lifecyle that looks for the existence of configured hooks. Uniswap will check our hook configuration by referencing that leading byte of our contract address. It will determine that we are indeed configured to use the beforeInitialize hook and will call that method on our contract. This method will create ERC20 tokens for each member. These tokens will represent their share of the liquidity pool.
function beforeInitialize(
        address,
        PoolKey calldata,
        uint160,
        bytes calldata
    ) external override returns (bytes4) {
        _mintTokensToFunders();
        return BaseHook.beforeInitialize.selector;
    }
Once the beforeInitialize completes, the initializePool logic is then executed, creating the liquidity pool. Once finished this triggers another check against our hook configuration.
function afterInitialize(
        address,
        PoolKey calldata,
        uint160,
        int24,
        bytes calldata
    ) external override returns (bytes4) {
        _addLiquidityToPool();
        return BaseHook.afterInitialize.selector;
    }
The afterInitialize method is called and this is when all user funds are added to the liquidity pool.
modifyPosition
Now that we have a liquidity pool, users can modify their position. You probably guessed it! This too is a trigger point and the most important one with respect to this contract. This function call will trigger our beforeModifyPosition hook logic and run verification against the caller.
function beforeModifyPosition(
        address,
        PoolKey calldata,
        IPoolManager.ModifyPositionParams calldata,
        bytes calldata
    ) external view override returns (bytes4) {
        if (msg.sender == owner()) {
            require(
                block.timestamp >= unlockTime,
                "FairTrade: Owner cannot change LP yet"
            );
        }
        return BaseHook.beforeModifyPosition.selector;
    }
This contract contains a state variable declaring the unlock time for the owner. This is used to unsure that the liquidity pool has matured and stabilized prior to the owner being able to modify their position.
 // LP unlocked one year from launch
    uint256 public unlockTime = block.timestamp + 365 days;
If this check was not provided there would be no guard preventing the owner from modifying their position immediately after a pool was initialized and withdrawing all liquidity. This hook ensures a fair trade and prevents a rug pull.
As the test continues, other users modify their positions. The hook is of course triggered and the guard is once again put in place. This is where the provided testing ends.
Using AI to understand the contract
There were times when reviewing this contract that I required additional context and had general queries. The best place to resolve blockers like these was ChefGPT. This is AI provided by cookbook.dev
When you are using cookbook and reviewing a contract like this they provide the AI with the context of the contract as a wrapper. This means you do not have to set the stage before providing queries. This was helpful and it did provide default prompts and a familiar AI interface, but what really aided me during contract discovery was from within the Expand tab, highlighting a piece of text would offer me the option to analyze that snippet.
This was this single most helpful feature! I highly recommend that you leverage the power of ChefGPT if you have blockers. You can use it to explain everything we went though or didn’t go through for that matter.
Conclusion
Now, finally, we are at the end of the lesson! Congratulations, you did it!
Since this lesson introduced a ton of new concepts, I'm sure you have some questions - if at any point you had doubts or something isn't working as expected, or just want to share your success, hop on the Cookbook.dev Discord Server and someone will be there for you!